Monday, 11 February 2013

How to easy make Layout using CSS?

Hi guyz!

Welcome back!!!!!

This section we will see how to make layout using CSS

Step 1: First you assing how many parts in your body section

ie


  • page
  • header
  • menu
  • content
  • footer

Step 2: Menu has two type (i.e) Horizantal menu vertical menu and content has two parts letf content and rightcontent


  • header
  • menu
    1. horizantal
    2. vertical
  • content
    1. leftcontent
    2. rightcontent
  • footer


  • Step3: Write CSS in page section and call the id in body section

    Write CSS in following way !
    <style type="text/css">

    #main_container
    {
    width:900px;
    height:500px;
    margin:0 auto;
    background-color:#00CC99;
    border:1px solid #006633;
    }

    </style>
    <body>

    <div id="main_container">

    </div>

    </body>

    Note: This code using for your page has been centered layout!


    Step4: Write CSS in   header section and call the id in main_container section

    Write CSS in following way !
    <style type="text/css">

    #header
    {
    width:900px;
    height:150px;
    border-bottom:10px solid #CC9900;
    }

    </style>
    <body>

    <div id="main_container">
    <div id="header"></div>

    </div>

    </body>


    Step5: Write CSS in  menu section and call the id in main_container  after the header section

    Write CSS in following way !
    <style type="text/css">


    #menu
    {
    width:900px;
    height:50px;
    border-bottom:1px solid #CC9900;
    }


    </style>
    <body>

    <div id="main_container">
    <div id="header"></div>
            <div id="menu"></div>
    </div>

    </body>


    Step6: Write CSS in  content section and the section divide into two parts 1.leftcontent 2.rightcontent. The left content id floated left and right content is floated right. After and call the id in main_container  after the menu section in following way

    <style type="text/css">


    #content
    {
    width:900px;
    height:300px;
    }
    #leftcontent
    {
    width:200px;
    height:300px;
    background-color:#99CC66;
    float:left;
    }
    #rightcontent
    {
    width:690px;
    height:300px;
    background-color:#99CC66;
    float:right;
    }


    </style>
    <body>

    <div id="main_container">
    <div id="header"></div>
            <div id="menu"></div>

           <div id="content">
    <div id="leftcontent"></div>
    <div id="rightcontent"></div>
    </div>

    </div>

    </body>


    Step7: Write CSS in  fotter section and call the id in main_container  after the content section

    <style type="text/css">


    #footer
    {
    width:900px;
    height:100px;
    background-color:#FF9900;
    }


    </style>
    <body>

    <div id="main_container">
    <div id="header"></div>
            <div id="menu"></div>

           <div id="content">
    <div id="leftcontent"></div>
    <div id="rightcontent"></div>
    </div>
            <div id="footer"></div>

    </div>

    </body>


    Step8: Thats done for your CSS Layout! Next add content(HTML elements) and add effect(styles).


    <head>
    <style type="text/css">
    #main_container
    {
    width:900px;
    height:600px;
    margin:0 auto;
    background-color:#99FF66;
    border:1px solid #006633;
    }
    #header
    {
    width:900px;
    height:100px;
    border-bottom:10px solid #CC9900;
    }
    #menu
    {
    width:900px;
    height:50px;
    border-bottom:1px solid #CC9900;
    }
    #content
    {
    width:900px;
    height:300px;
    }
    #leftcontent
    {
    width:200px;
    height:300px;
    background-color:#99CC66;
    float:left;
    }
    #rightcontent
    {
    width:690px;
    height:300px;
    background-color:#99CC66;
    float:right;
    }
    #footer
    {
    width:900px;
    height:80px;
    background-color:#FF9900;
    }
    #menu ul
    {
    list-style-type:none;
    padding-left:0px;
    }
    #menu li
    {
    display:inline;
    padding-right:20px;
    color:#FF0000;
    }
    .left
    {
    width:190px;
    height:150px;
    border:1px solid #009933;
    }
    #rightcontent h3
    {
    color:#006666;
    padding:20px;
    }
    #rightcontent p
    {
    padding:20px;
    text-align:justify;
    }
    </style>
    </head>
    <body>

    <div id="main_container">
    <div id="header"><h1>My BLog</div>
    <div id="menu">
    <ul>
    <li>Home</li>
    <li>About Us</li>
    <li>Services</li>
    <li>Carrer</li>
    <li>Training </li>
    <li>Contact Us</li>
    </ul>

    </div>
    <div id="content">
    <div id="leftcontent">
    <div class="left"><h4>Catagries</h4></div>
    <div class="left"><h4>Archives</h4></div>
    </div>
    <div id="rightcontent">
    <h3>Welcome to our website</h3>
    <p>CSS is designed primarily to enable the separation of document content (written in HTML or a similar markup language) from document presentation, including elements such as the layout, colors, and fonts.[1] This separation can improve content accessibility, provide more flexibility and control in the specification of presentation characteristics, enable multiple pages to share formatting, and reduce complexity and repetition in the structural content (such as by allowing for tableless web design). CSS can also allow the same markup page to be presented in different styles for different rendering methods, such as on-screen, in print, by voice (when read out by a speech-based browser or screen reader) and on Braille-based, tactile devices. It can also be used to allow the web page to display differently </p>
    </div>
    </div>
    <div id="footer"><p align="center">Website design by XXXXXXX</div>
    </div>

    </body>

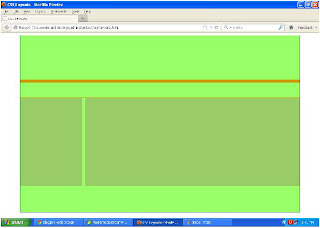
    The output is:


    Saturday, 9 February 2013

    Learn more CSS Properties?

     Hi friends....

    Welcome back to My Blog !

    Today we will see Basic CSS Properties and How to use?

    Basic CSS Properties


    • CSS Background
    • CSS Text
    • CSS Font
    • CSS Link
    • CSS List
    • CSS Box Model
    • CSS Margin
    • CSS Border
    • CSS Padding
    • CSS Floating
    • CSS Display
    • CSS Visibility

    Am share one by one... 

    First am share Background Properties

    CSS Background

    • CSS Background properties are used to defines the background of an element.
    • CSS properties used for background effects


    background-color background-image background-repeat background-Attachment Background-position
    The background-color property specifies the background color of an element.
    The color selected in 3 ways
    HEX Value
    RGB Value
    Name Value
    The background-image property specifies the background image of an element.
    Default the image is repeated, so it covers entire element
     
    This property used repeats ann image both horizantaly or vertically.
    and set background image how to displayed an element.
    you can set the image has no repaet or horizantally repaet or vertically repeat.
    This property specify the image has scroll or fixed This property specify the starting of background-image.
    You can set starting position in 2 ways

    Possible values in this property:

                               background-color:#FFF000;
                              background-image:url('bg.jpg');
                             background-repeat:no-repeat;
                             background-repea:repeat-x;
                            background-repea:repeat-y;
                       background-attchment:scroll;
                       background-attchment:fixed;
                          background-position:right;
                          background-position:20% 50%;

    Example:

    First am set width and height and background color my header section.
    <html>
    <head>
    <style>
    #header
    {
       width:1000px;
       height-:150px;
       background-color:#FFFF99;
    }
    </style>
    </head>
    <body>
      <div id="header">
               <h1>My Blog</h1>
      </div>
    </body>
    </html>

    Output is:

    Example:

    First am set width and height and background image my header section.

    <html>
    <head>
    <style>
    #header
    {
       width:1000px;
       height-:150px;
       background-image:url(logo.jpg);
    }
    </style>
    </head>
    <body>
      <div id="header">
               <h1>My Blog</h1>
      </div>
    </body>
    </html>

    Output is:

    Note: Default image will repeated, you may change use background-repeat property

    This example am set image no repeated!

    <html>
    <head>
    <style>
    #header
    {
       width:1000px;
       height-:150px;
       background-image:url(logo.jpg);
       background-repeat:no-repeat;
    }
    </style>
    </head>
    <body>
      <div id="header">
               <h1 align="center">My Blog</h1>
      </div>
    </body>
    </html>

    Output is;

    You can set starting position use background-position property.. please look following example


    <html>
    <head>
    <style>
    #header
    {
       width:1000px;
       height-:150px;
       background-image:url(logo.jpg);
       background-repeat:no-repeat;
       background-position:70% 10%;
    }
    </style>
    </head>
    <body>
      <div id="header">
               <h1 align="center">My Blog</h1>
      </div>
    </body>
    </html>

    Output is:


    CSS Text Properties:

        CSS Text Properties used to text formatting properties there are some text properties used often in your webpage.


    • text-color or color
    • text-align
    • text-decoration
    • text-transform
    • text-indent
          text-color or color property is used to set the color of the text,the color selected in 3 ways HEX value,RGB value and name value.
                 color :#CC0000;
                         :rgb(255,0,0);
                         :"pink";
          text-align properties is used to to set the horizantal align ment of a text.possible alignment is left,right,center,justify.
                              text-align:left;
                                            :right;
                                            :center;
                                            :justify;
         text-decoration is used to set/remove decoration from text. text-decoration mostly used to temove the underline from hyperlinks for design purpose.
                        text-decoration:none;
                                               :overline;
                                               :line-through;
                                               :underline;
                                               :blink;
    text-transform is used to specify the uppercase or lowercase letters in a text.
                          text-transform:uppercase;
                                               :lowercase;
                                               :capitalize;

    Other Text properties is
    letter-spacing
    vertical-spacing
    white-spacing
    word-spacing

    Example:
    <style>
    .textprop
    {
    color:#CC0000;
    text-align:right;
    text-transform:uppercase;
    text-decoration:underline;
    letter-spacing:2px;
    }
    </style>

    <body>
    <p>text-color or color property is used to set the color of the text,the color selected in 3 ways HEX value,RGB value and name value.</p>
    <a href="home.html">Back to Home</a>
    </body>

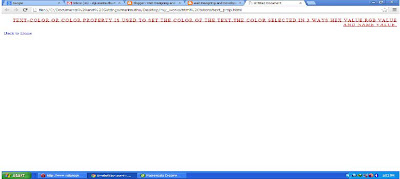
    The output is:

    Note : The above example the paragraph is make right alignment and letter spacing is 2px and decoration in underline, and transform is uppercase. The hyperlink displayed Underline.If you remove undeline use following codesin style
    a
    {
    text-decoration:none;
    }

    CSS Font:

    CSS Font properties define the font size, family,style,weight of a text.

    The CSS Font Properties are

    font-family
    font-size
    font-style
    font-variant
    font-weight

    CSS Links:

    Links are be styled in different ways. There are four link states available

    a:link
    a:hover
    a:visited
    a:active

    Example:
    <head>
    <style type="css/text">
    a
    {
    text-decoration:none;
    }
    a:link
    {
    color:#33FFCC;
    }
    a:visited
    {
    color:#336699;
    }
    a:hover
    {
    color:#FF0000'
    }

    </style>
    </head>
    <body>
    <a href="home.html">Home</a>
    <a href="about.html">About us</a>
    <a href="services.html">Services</a>
    <a href="training.html">Training</a>
    <a href="contact.html">Contact</a>
    </body>

    CSS Lists:

         CSS List property are allowed ordered and unordered or set image an List Item. There are three CSS List property available.

    list-style-type
    list-style-image
    list-style-position

    Example:

    <head>
    <style type="css/text">
    a
    {
    text-decoration:none;
    }
    a:link
    {
    color:#33FFCC;
    }
    a:visited
    {
    color:#336699;
    }
    a:hover
    {
    color:#FF0000'
    }
    ul
    {
    list-style-type:none;
    }
    li
    {
    width:200px;
    height:40px;
    }
    </style>
    </head>


    <body>
    <ul>
    <a href="home.html"><li>Home</li></a>
    <a href="about.html"><li>About us</li></a>
    <a href="services.html"><li>Services</li></a>
    <a href="training.html"><li>Training</li></a>
    <a href="contact.html"><li>Contact</li></a>
    </ul>
    </body>

    CSS Display and CSS Visibility

    Display property used to if how to an element to displayed that is block or inline
    Visibility property is usedto specify an element should be visible or hidden

    The above two property is used for major used for making horizantal and vertical menu.

    Block:
    Block is an element that takes up width and height. It use for vertical menu creation

    ul
    {
    list-style-type:none;
    display:block;
    width:500px;
    height:300px;
    background-color:#3366CC;
    }

    Inline
    An inline element only takes up as much widthnot necessary. it use for horizantal menu creation

    ul
    {
    list-style-type:none;
    }
    li
    {
    display:inline;
    }

    Hide an element:
    If you want hide an element in your webpage. it achive in two ways
    visibility:hidden;
    display:none;


    Learn CSS ID Vs CLASS

    Hi friends... Welcome back!

    Today will see CSS Id and Class. and how to use Id & Class.

    Ok Lets come!

    CSS Id:

            The Id selector is used to specify a style for a single,unique element.
            The Id selector is defined in "#"

    Syntax:


    CSS Class:

           The Class selector is used to specify a style for a group of elements.
           The Class selector is most often used several elements.
           The Class selector defined ".".

    Syntax:


    Example:


    <html>
    <title>CSS Example</title>
    <style type="text/css">
    #idselector
    {
    width:400px;
    height:200px;
    background-color:#FFFF99;
    border:1px solid #FF0033;
    }
    .classselector
    {
    width:400px;
    height:200px;
    background-color:#00CC66;
    border:1px solid #CC0033;
    }
    </style>
    </head>

    <body>
    <div id="idselector"><h1>Hello</h1></div>
    <br>
    <div class="classselector"><p>Google
    www.google.co.in/Indian version of this popular search engine. Search the whole web or only webpages from India. Interfaces offered in English, Hindi, Bengali, Telugu, Marathi .</p>
    </div>
    </body>
    </html>


    Outout is:


    Note: You want add Id and Class is same html elements or division like following example.

    Example 

    <div id="idselector" class="classselector">......</div> 


    Next section i will explain full CSS Property and how to use in your HTML Page!

    Thank you Guyz!

    Friday, 8 February 2013

    Lesson 4: Learn more HTML Layouts using Tables ?

    Hi friends welcome back to My Blog....

    Last lesson we learn make HTML Layouts. In this lesson we learn how to make different style of layouts.

    Ok lets come!

    First of all we know basic things of Layout. how to divide layout portions. simply we divide following parts


    • Header
    • Menu
    • Content
    • Left menu
    • Left content
    • Right content
    • Footer
    And you think how to order above parts in your webpage.

    Am here share some layouts model using HTML models in step by step....

    Step 1: First you think how many rows and columns and you want inner table also add in your table

    Step 2: For example am here make 3 rows and 1 columns. and 1 inner table 1 row 1 column.

    Step 3
                                     <table width="1000" border="1">
                                              <tr>
                                                     <td>Header</td>
                                               </tr>
                                                <tr>
                                                     <td>Insert inner table will soon</td>
                                                </tr>
                                                <tr>
                                                     <td>Footer</td>
                                                </tr>
                                      </table>
    Output is:


    Step 4:
     
                                     <table width="1000" border="1">
                                              <tr>
                                                     <td>Header</td>
                                               </tr>
                                                <tr>
                                                     <td>
                                                               <table width="200" border="1">
                                                            <tr>
                                                                             <td>Left menu</td>
                                                                 <td>Content</td>
                                                             </tr>
                                                        </table>
                                                   <</td>
                                                </tr>
                                                <tr>
                                                     <td>Footer</td>
                                                </tr>
                                      </table>

    Output is:


    Step 5: Layout is done ! And make adjust width and height and align and valign

                     <table width="1000" border="1">
                                       <tr>
                                                 <td height="108" valign="top">Header</td>
                                       </tr>

                                         <tr>
                                                <td height="349" valign="top">
                                                    <table width="987" height="326" border="1">
                                            <tr>
                                                         <td width="206" height="320" valign="top">left menu </td>
                                            <td width="707" valign="top">content</td>
                                            </tr>
                                                      </table>

                                        </td>
                                         </tr>

                                         <tr>
                                               <td valign="top">footer</td>
                                         </tr>
                        </table>

    Output is:


    Step 6: Ok fine! we add effect bgcolor or background image on header section.

    Step 7: Next add menu in left menu section using HTML List.

    Step 8: Next make web description on content section using Paragraph and image elements.

    Step 9: Next add footer section

                 <table width="1000"  cellpadding="0" cellspacing="0">
                      <tr>
                         <td height="108" valign="top" bgcolor="#0099FF"><h1>Training Blog</h1></td>
                    </tr>
                     <tr>
                          <td height="349" valign="top">
                                 <table width="996" height="349"  cellpadding="0" cellspacing="0">
                          <tr>
                                        <td width="221" height="343" valign="top" bgcolor="#66CCFF">
                                  <ul>
                                      <li>Home</li>
                                      <li>About Us</li>
                                       <li>Vision</li>
                                       <li>Mission</li>
                                      <li>Services</li>
                                      <li>Training</li>
                                      <li>Contact Us</li>
                                  </ul>
                        </td>
                        <td width="769" valign="top" bgcolor="#66CCFF">
                             <h4>Welcome to our website</h4>
                                    <p><img src="images/flowers.jpg" width="100" height="100" />                                                              is html page  This is html page  This is html page
     This is html page  This is html page  This is html page  This is html page  This is html page
       This is html page  This is html page  This is html page  This is html page  This is html page
     This is html page  This is html page  This is html page  This is html page  This is html page
       This is html page  This is html page  This is html page  This is html page  This is html page
     This is html page  This is html page  This is html page  This is html page  This is html page  
       This is html page  This is html page  This is html page  This is html page  This is html page
     This is html page  This is html page  This is html page</p>
    </td>
      </tr>
    </table>

    </td>
      </tr>
      <tr>
        <td valign="top" bgcolor="#0099FF"><p align="center">WEBSITE DESIGNED BY MARIS</p></td>
      </tr>
    </table>

    Output is:


    Step 10: Thank you !

    Wednesday, 6 February 2013

    Lession 3: How to make page layout Using HTML table?

    Hi welcome back to My Blog!

    I hope in last two three lession you are gain some basic knowledge in HTML.

    Ok today we will see how to make layout based webpages using HTML tables.There are some steps we can make layouts.

    Ok friends lets come....

    Page Layout Using HTML table

    Step1: First calculate how many rows and columns(Ex: 3 row, 1 col)

    step2: To create tables in 3 rows and 1 coloums


                                                 <table width="200" border="1">
                                                             <tr>
                                                                       <td>Header</td>
                                                             </tr>
                                                              <tr>
                                                                       <td>Content</td>
                                                              </tr>
                                                              <tr>
                                                                         <td>Footer</td>
                                                              </tr>
                                                </table>

    Output:

    Step3: Thats all ! you are done 90%.

    Step 4: There are some add basic attributes and elements.

    Step5: To set table width and height.
    Step6: To set  Ist row(header) td width and height.
    Step7: To set  2st row (content)td width and height.
    Step8: To set  3Ist row(footer) td width and height.


    <table width="1000"  align="center">
      <tr>
        <td width="1000" height="150"  valign="top"></td>
      </tr>
      <tr>
        <td width="1000" height="350"  valign="top">
    </td>
      </tr>
      <tr>
        <td width="1000" height="100"  valign="top"></td>
      </tr>
    </table>

    Output:


    Step9: To add effect like bgcolor

    <table width="1000"  align="center">
      <tr>
        <td width="1000" height="150" bgcolor="#FF0066" valign="top"></td>
      </tr>
      <tr>
        <td width="1000" height="350" bgcolor="#FF6666" valign="top">
    </td>
      </tr>
      <tr>
        <td width="1000" height="100" bgcolor="#FF0066" valign="top"></td>
      </tr>
    </table>
     
    Output:


    Step10: To add heading content and footer

    <table width="1000"  align="center">
      <tr>
        <td width="1000" height="150" bgcolor="#FF0066" valign="top"><font color="#FFFFFF"><h1>My Blog</h1></font></td>
      </tr>
      <tr>
        <td width="1000" height="350" bgcolor="#FF6666" valign="top">
    <h3>Welcome To My Blog</h3>
    <p>this is text this is text this is text this is text this is text this is text this is text 
    this is text this is text this is text this is text this is text this is text this is text 
    this is text this is text this is text this is text this is text this is text 
    this is text this is text this is text this is text this is text this is text this is text 
    this is text this is text this is text this is text this is text this is text this is text 
    this is text this is text this is text this is text this is text 
    this is text this is text this is text this is text this is text this is text this is text 
    this is text this is text this is text this is text this is text this is text this is text </p></td>
      </tr>
      <tr>
        <td width="1000" height="100" bgcolor="#FF0066" valign="top"><font color="#FFFFFF"><p align="center">Designed by XXXXXX</p></font></td>
      </tr>
    </table>


    Output:


    Ok fine!......

    What is AI- Artificial Intelligence - தமிழில்

    Artificial Intelligence : Artificial intelligence leverages computers and machines to mimic the problem-solving and decision-making capabili...